서블릿 컨테이너 초기화 1

- WAS를 실행하는 시점에 필요한 초기화 작업들이 있다. 서비스에 필요한 필터와 서블릿을 등록하고, 여기에 스프링을 사용한다면 스프링 컨테이너를 만들고, 서블릿과 스프링을 연결하는 디스페처 서블릿도 등록해야 한다.
- WAS가 제공하는 초기화 기능을 사용하면, WAS 실행 시점에 이러한 초기화 과정을 진행할 수 있다. 과거에는 web.xml 을 사용해서 초기화했지만, 지금은 서블릿 스펙에서 자바 코드를 사용한 초기화도 지원한다.
서블릿 컨테이너 초기화 개발
- 서블릿은 ServletContainerInitializer 라는 초기화 인터페이스를 제공한다. 이름 그대로 서블릿 컨테이너를 초기화 하는 기능을 제공한다.
- 서블릿 컨테이너는 실행 시점에 초기화 메서드인 onStartup() 을 호출해준다. 여기서 애플리케이션에 필요한 기능들을 초기화 하거나 등록할 수 있다.
ServletContainerInitializer
public interface ServletContainerInitializer {
    public void onStartup(Set<Class<?>> c, ServletContext ctx) throws ServletException;
}- Set<Class<?>> c : 조금 더 유연한 초기화를 기능을 제공한다. @HandlesTypes 애노테이션과 함께 사용한다.
- ServletContext ctx : 서블릿 컨테이너 자체의 기능을 제공한다. 이 객체를 통해 필터나 서블릿을 등록할 수 있다.
MyContainerInitV1
public class MyContainerInitV1 implements ServletContainerInitializer {

  @Override
  public void onStartup(Set<Class<?>> c, ServletContext ctx) throws ServletException {
    System.out.println("MyContainerInitV1.onStartup");
    System.out.println("MyContainerInitV1 c = " + c);
    System.out.println("MyContainerInitV1 ctx = " + ctx);
  }
}- 로그를 찍어보면서 실제로 서블릿 컨테이너가 초기화되는 시점에 호출이 되는지 확인하자
WAS에게 실행할 초기화 클래스를 알려줘야 한다.(resources/META-INF/services/jakarta.servlet.ServletContainerInitializer)
hello.container.MyContainerInitV1- 이 파일에 방금 만든 MyContainerInitV1 클래스를 패키지 경로를 포함해서 지정해주자
- 이렇게 하면 WAS를 실행할 때 해당 클래스를 초기화 클래스로 인식하고 로딩 시점에 실행한다.
이렇게 하고 실행하게 되면 로그가 잘 출력되는 것을 확인할 수 있다.

서블릿 컨테이너 초기화 2
서블릿을 등록하는 방법에는 2가지 방법이 있다.
- @WebServlet 애노테이션
- 프로그래밍 방식
프로그래밍 방식에 대해 자세히 알아보자
HelloServlet
public class HelloServlet extends HttpServlet {

  @Override
  protected void service(HttpServletRequest req, HttpServletResponse resp)
      throws IOException {
    System.out.println("HelloServlet.service");
    resp.getWriter().println("hello servlet");
  }
}
- 이 서블릿을 등록하고 실행하면 다음과 같은 결과가 나온다. 다음 내용을 통해서 서블릿을 등록해보자.
- 로그: HelloServlet.service
- HTTP 응답: hello servlet!
AppInit
public interface AppInit {
  void onStartup(ServletContext servletContext);
}- 애플리케이션 초기화를 진행하려면 먼저 인터페이스를 만들어야 한다. 내용과 형식은 상관없고, 인터페이스는 꼭 필요하다.
AppInitV1Servlet
public class AppInitV1Servlet implements AppInit{

  @Override
  public void onStartup(ServletContext servletContext) {
    System.out.println("AppInitV1Servlet.onStartup");

    //순수 서블릿 코드 등록
    Dynamic helloServlet = servletContext.addServlet("helloServlet", new HelloServlet());
    helloServlet.addMapping("/hello-servlet");
  }
}
- AppInit 인터페이스를 구현하여 helloServlet을 등록하는 코드를 작성하자
- 여기서는 프로그래밍 방식으로 HelloServlet 서블릿을 서블릿 컨테이너에 직접 등록한다.
- HTTP로 /hello-servlet를 호출하면 HelloServlet 서블릿이 실행된다.
참고 - 프로그래밍 방식을 사용하는 이유
@WebServlet을 사용하면 애노테이션 하나로 서블릿을 편리하게 등록할 수 있다. 하지만 애노테이션 방식을 사용하면 유연하게 변경하는 것이 어렵다. 마치 하드코딩 된 것처럼 동작한다. 아래 참고 예시를 보면 "/test" 경로를 변경하고 싶으면 코드를 직접 변경해야 바꿀 수 있다.
반면에 프로그래밍 방식은 코딩을 더 많이 해야 하고 불편하지만 무한한 유연성을 제공한다.
예를 들어서 "/hello-servlet" 경로를 상황에 따라서 바꾸어 외부 설정을 읽어서 등록할 수 있다. 서블릿 자체도 특정 조건에 따라서 if 문으로 분기해서 등록하거나 뺄 수 있다. 서블릿을 내가 직접 생성하기 때문에 생성자에 필요한 정보를 넘길 수 있다.
애플리케이션 초기화
MyContainerInitV2
@HandlesTypes(AppInit.class)
public class MyContainerInitV2 implements ServletContainerInitializer {

  @Override
  public void onStartup(Set<Class<?>> c, ServletContext ctx) throws ServletException {
    System.out.println("MyContainerInitV2.onStartup");
    System.out.println("MyContainerInitV2 c = " + c);
    System.out.println("MyContainerInitV2 ctx = " + ctx);

    //class hello.container.AppInitV1Servlet
    for (Class<?> appInitClass : c) {
      try {
        //new AppInitV1Servlet()과 같은 코드
        AppInit appInit = (AppInit) appInitClass.getDeclaredConstructor().newInstance();
        appInit.onStartup(ctx); //구현체를 실행시켜 주면서 servlet을 등록해준다.
      } catch (Exception e) {
        throw new RuntimeException(e);
      }
    }
  }
}- @HandlesTypes 애노테이션에 애플리케이션 초기화 인터페이스를 지정한다.
- 여기서는 앞서 만든 AppInit.class 인터페이스를 지정했다.
- 서블릿 컨테이너 초기화( ServletContainerInitializer )는 파라미터로 넘어오는 Set<Class<?>> c 에 애플리케이션 초기화 인터페이스의 구현체들을 모두 찾아서 클래스 정보로 전달한다.
- 여기서는 @HandlesTypes(AppInit.class) 를 지정했으므로 AppInit.class 의 구현체인 AppInitV1Servlet.class 정보가 전달된다.
- 참고로 객체 인스턴스가 아니라 클래스 정보를 전달하기 때문에 실행하려면 객체를 생성해서 사용해야 한다.
- 여기서는 @HandlesTypes(AppInit.class) 를 지정했으므로 AppInit.class 의 구현체인 AppInitV1Servlet.class 정보가 전달된다.
- appInitClass.getDeclaredConstructor().newInstance()
- 리플렉션을 사용해서 객체를 생성한다. 참고로 이 코드는 new AppInitV1Servlet() 과 같다 생각하면 된다
- appInit.onStartup(ctx)
- 애플리케이션 초기화 코드를 직접 실행하면서 서블릿 컨테이너 정보가 담긴 ctx 도 함께 전달한다
MyContainerInitV2 등록(resources/META-INF/services/jakarta.servlet.ServletContainerInitializer)
hello.container.MyContainerInitV1
hello.container.MyContainerInitV2
정리
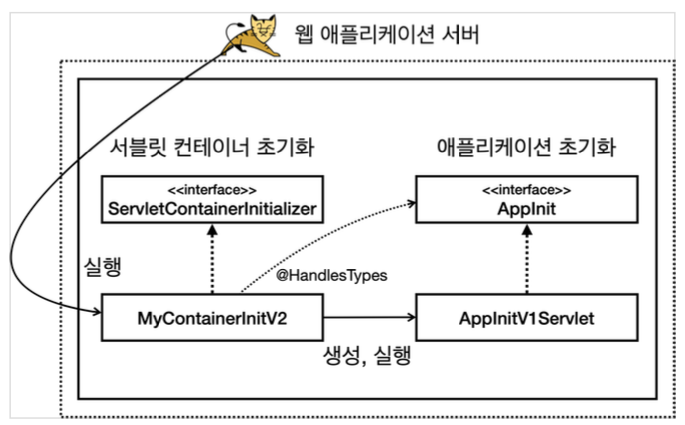
- 초기화는 다음 순서로 진행된다.
- 서블릿 컨테이너 초기화 실행(resources/META-INF/services/jakarta.servlet.ServletContainerInitializer)
- 애플리케이션 초기화 실행 (@HandlesTypes(AppInit.class))
참고
서블릿 컨테이너 초기화만 있어도 될 것 같은데, 왜 이렇게 복잡하게 애플리케이션 초기화라는 개념을 만들었을까?
- 편리함
- 서블릿 컨테이너를 초기화 하려면 ServletContainerInitializer 인터페이스를 구현한 코드를 만들어야 한다. 여기에 추가로 파일에 해당 코드를 직접 지정해주어야 한다. 애플리케이션 초기화는 특정 인터페이스만 구현하면 된다.
- 의존성
- 애플리케이션 초기화는 서블릿 컨테이너에 상관없이 원하는 모양으로 인터페이스를 만들 수 있다. 이를 통해 애플리케이션 초기화 코드가 서블릿 컨테이너에 대한 의존을 줄일 수 있다.
- 특히 ServletContext ctx 가 필요없는 애플리케이션 초기화 코드라면 의존을 완전히 제거할 수도 있다.
'스프링 부트(핵심 원리와 활용)' 카테고리의 다른 글
| Ch01. 웹 서버와 서블릿 컨테이너 - 스프링 MVC 서블릿 컨테이너 초기화 지원 (0) | 2023.03.03 |
|---|---|
| Ch01. 웹 서버와 서블릿 컨테이너 - 스프링 컨테이너 등록 (0) | 2023.03.03 |
| Ch01. 웹 서버와 서블릿 컨테이너 - 톰켓 설정 (0) | 2023.03.02 |
| Ch01. 웹 서버와 서블릿 컨테이너 - WAR 빌드와 배포 (0) | 2023.03.01 |
| Ch01. 웹 서버와 서블릿 컨테이너 - 웹 서버와 스프링 부트 소개 & 톰켓 설치 & 프로젝트 설정 (0) | 2023.03.01 |